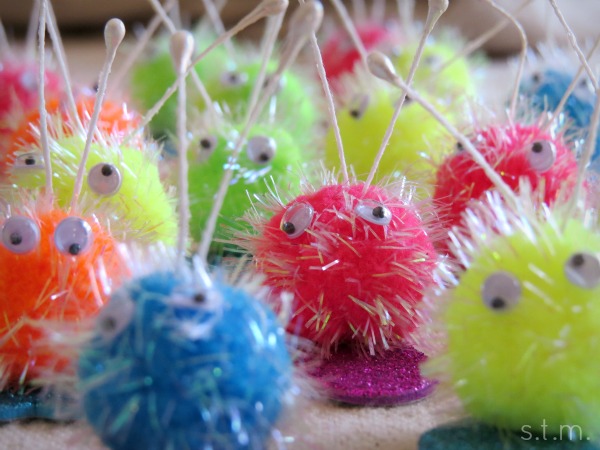
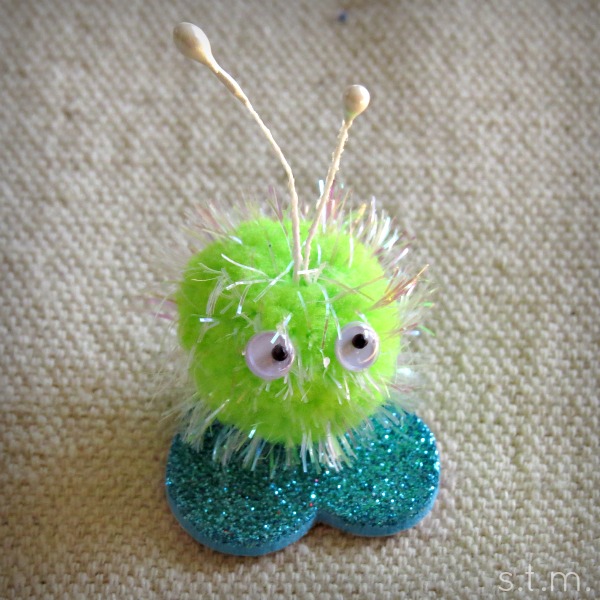
Category: Craftiness

General craft ideas, including sewing projects, kid-friendly ideas and VBS inspiration.

From Floor to Table:  Easy Drop Cloth Table Runner

From Floor to Table: Easy Drop Cloth Table Runner

drop cloth table runner

I have a larger-than-most dining room table in my home, coming in at just under eight feet long when both drop leaves are up and over three feet wide to boot. Needless to say, it can be difficult to find the right type and size of table runner for the dining room so I decided to whip up one of my own using a spare drop cloth and a few quick stitches.

Let me start by clueing you in on my inspiration for this project, other than the fact that I had all the supplies and knew it wouldn’t get much quicker or easier than this. I follow a small home and lifestyle blog called Little Farmstead and Julie is always sharing photos of her beautiful and cozy house. In one of her recent posts she showed a close-up photo of her table, complete with runner, and that’s when the light bulb went off in my head. While it looks as if her table dressing is perhaps made of linen, I had a drop cloth and so I gave it a go.

To make my little (or actually rather large) runner, I decided on a width and length for the finished piece,  used scissors to make snips and simply tore the cloth at the cuts to create the finished dimensions. With my sewing machine, I stitched two close lines about a quarter-inch from the frayed edge along the entire length of all four sides, and that was it. I used a matching thread for stitching, but I think a contrasting thread would add a cute little pop of color.

drop cloth table runner

So there you have it — my drop cloth turned table runner. It just doesn’t get much easier than that, and I gotta say I’m diggin’ it (even the hubs piped up with a compliment).

Touch of Tartan DIY Wreath

Touch of Tartan DIY Wreath

RagWreath2

In the spirit of all that is plaid this jolly time of year, I finally finished the newest addition to my Christmas décor, a rag wreath that adds a tiny touch of tartan to the entry of my home. I made this cute little thing using two coordinating types of plaid fabric, some heavy gauge wire and a bit of burlap ribbon. I used about 200 1.5×6 inch ripped strips of cloth for this project and created it in exactly the same way as I did my St. Patrick’s wreath this spring. You can read all the DIY details by visiting that earlier post.

So here’s to last-minute decoration ideas; and by the way, this one can be completed in about two hours. May your boughs we decked and your halls be jolly, and may you enjoy this Christmas time of year.

RagWreath1D

Check out some other great wreath ideas at BloomNation’s #AlwaysBeBlooming project.

bloomnation_wreath

Talking Turkey with Crafty Coffee Filters

Talking Turkey with Crafty Coffee Filters

turkeycraft1

My son and I had a great time making these cute little coffee filter turkeys (or in his case, cyclops turkey monster) last year right before the holidays, so I wanted to share this quick, colorful and child-friendly craft with all of you this year. I hope you and your little one(s) have fun too!

Materials:

  • Non-permanent magic markers
  • coffee filter
  • scissors
  • glue
  • google eyes
  • brown and yellow construction paper
  • downloaded turkey body pattern
  • spray bottle with water
  • iron (optional)
  • small magnet circle or strip (optional)

How to make it:

  1. Flatten a coffee filter, then fold it in half four times so that you end up with a wedge. Using scissors, cut a curve at the top of this folded filter.turkeysteps
  2. Unfold the cut filter completely and let your child color all over it with markers. The more color the better.
  3. Lightly spray the filer with water and set aside to dry. This will mix and mute the colors on the filter. If the filter doesn’t dry quickly enough, you can use a hot iron to speed up the process. (Parents, please use caution with hot irons around children. This optional step is best left to the grownups.)
  4. Fold the dry filter in half so that one side is slightly lower than the other and the curved parts of the edges don’t quite line up. This will be the finished turkey tail.
  5. Using the downloaded turkey body pattern, cut a body from the brown construction paper.
  6. Next use markets to color a red wattle (for you city folks, that’s the red wrinkly thing that hangs around the beak) and brown or black feet on the body.
  7. Cut a beak from the yellow construction paper and glue it on.
  8. Glue on two (or how ever many your child might like) google eyes so your turkey can see.
  9. Lastly glue on the folded turkey tail. It’s best to put a dab of glue between the two tail layers also.
  10. If you want to proudly display your turkey on the fridge, simply add a magnet to the back after everything else has dried.

turkey2

Page 7 of 13
1 5 6 7 8 9 13