Category: Craftiness

General craft ideas, including sewing projects, kid-friendly ideas and VBS inspiration.

Rainy Day Caterpillar Craft

Rainy Day Caterpillar Craft

caterpillar1

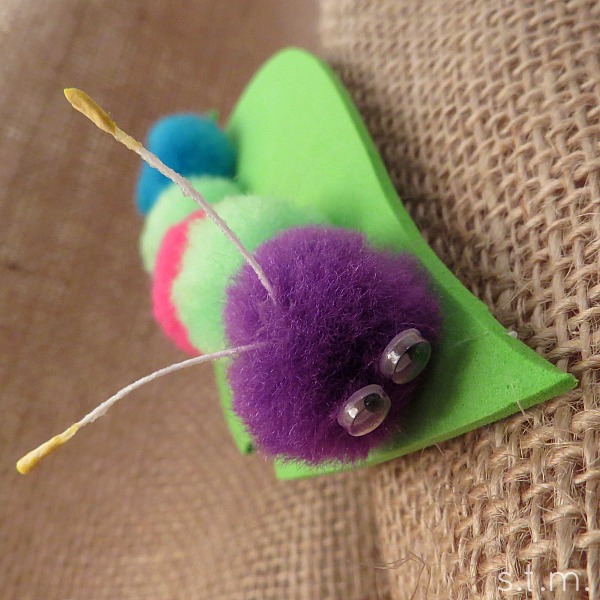
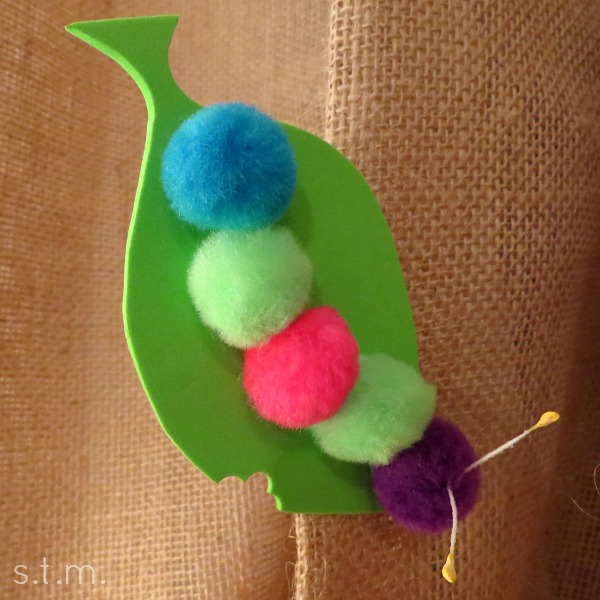
It rained here today. . . for the umpteenth day straight. But thankfully it was also MOMS Club® craft day at my house, which is always a good way to spend a few hours of the day (especially when I don’t have to leave home). Today’s project was this cute little pompon caterpillar that was also a former VBS project, so rounding up the supplies was a breeze.

Here’s what you need:

  • 5 medium pompons
  • green craft foam sheet
  • printable leaf pattern
  • glue
  • small google eyes
  • flower stamen or light-gauge wire
  • clothes pin
  • hole punch
  • scissors

caterpillar2

How to make your cute caterpillar:

  1. Cut out a leaf from the green craft foam using the printable leaf pattern. If you want to add bite marks, use the hole punch to punch three holes in the side of the leaf.
  2. Adhere all five of the pompons onto your leaf using glue.
  3. Fold a flower stamen, or a short piece of wire, in half and glue it on top of the first pompon, and glue on two google eyes for the face.
  4. After all the pieces are dry, glue a clothes pin on the underside of the leaf so that you can clip this cute little caterpillar on any number of places.


Just in Time for St. Patty’s Day Wreath

Just in Time for St. Patty’s Day Wreath

Spring Break is winding down here at the Quarter-Acre Wood and this week has been filled with lots of goings-on that I can’t wait to share with all of you. I’m way behind on my latest events and accomplishments, because my sister, great niece and one of my niece’s friends arrived Sunday to do Spring Break Kansas City style and we have been going ever since.

So first, let me back up to St. Patrick’s Day, yes I know it came and went. . . three days ago, but I so want to show you my new little craft project perfect for the greenest of days. Okay, so I bought the supplies a month ago but I only put it all together the morning of the seventeenth (I told you I was a procrastinator). I was completely determined to make that wreath by St. Patty’s Day, even if it took me until midnight. I’m happy to say it went together quite quickly and we got to enjoy it for several hours. Oh, who am I kidding, it’s still hanging on my door. . . but it’s just so cute. 

St. Patty's Day wreath

Here’s what you’ll need to make your own St. Patty’s Day wreath :

  • 1/4 yard of 5 different green fabrics
  • heavy-gauge wire or coat hanger
  • rotary cutter and cutting mat or scissors (a rotary cutter will make this project a snap)
  • ribbon

This is how you put it all together:

  1. To create the round shape, I used wire that was less stiff than a coat hanger, but still had enough strength to hold it’s shape. I would love to tell you what gauge it happened to be, but that label has long since gone away. Just shape the wire and bend the ends together or, if you’re using a coat hanger, snip off the hanger part and then shape into a circle. I ended up with a circle diameter of 15″, but you can make it a bit larger or smaller as needed.
  2. Using my rotary cutter, I cut 1″ x 6″ strips from each of the five fabrics. You can use scissors or the snip and rip method to cut your strips, but a rotary cutter makes this task so much faster, especially if you fold your fabric a couple of times.
  3. I cut 32 strips from each of the fabrics and used just about everyone one of them on my 15″ diameter wreath. So that was approximately 160 small little pieces of fabric.
  4. To adhere the fabric, simply tie them in a knot all the way around the wreath. I chose a pattern in which to tie them and stuck to it all the way around. Tie a few pieces and then push them together tightly around the wire, then repeat. By continually pushing the tied pieces together, you will get a fuller, fluffier finished product.
  5. After all the fabric strips are tied to your wreath. Cut and tie a long piece of ribbon for the bow.
  6. Lastly pull all the fabric strips ends toward the front of the wreath and fluff them for a finished look.

My sister, the one in town, thought this was a really cute project and made plans to create an Easter or Spring wreath of her own. You really could do one for any holiday just by changing the fabric you choose.

Kid-Friendly Valentine Banner

Kid-Friendly Valentine Banner

Last year my son (three years old at the time) and I spent part of a cold snow day creating a cute little Valentine project for aunts and grandmothers (of course I kept one for myself). Although they all might have been a bit biased, these cute little banners were a hit; so today I thought I would re-share our kid-friendly craft with all of you. I came up with this quick banner idea by combining a couple of Pinterest projects with some of my son’s favorite things — paint and glue.

 To create your own Valentine banner you will need:

  • brown paper lunch bags
  • empty toilet paper/paper towel roll
  • red washable paint
  • scissors
  • glue
  • string

To begin the project, cut a paper bag right above the bottom fold. Then cute along the two outside edges to give you two rectangular banner pieces. If you want, you can cut a triangle out of each of those pieces or just leave them square on the bottom. Cut as many bags as you desire for your project. If your child is old enough to handle the scissors, great but make sure an adult supervises this task (I let my three year old, cut on some scrap pieces, but he wasn’t up for the first part of this project).

TPheartstamp2Next, shape the empty toilet paper roll into a heart. I started by creasing the top inward, being carefully not to make creases in the rounded parts of the heart, and then I creased the bottom point of the heart. After you have the shape to your liking, pour some washable paint on a paper plate. Have your child grasp the TP heart roll around the middle to hold its shape, dip an end into the paint and stamp it onto each banner piece. Your child can redip as necessary.

After the paint dries, flip over each banner piece and run a bead of glue along the top of each one. My son loved doing this and it really didn’t matter that he got a little sloppy (you might want to cover your work space before this step). Meanwhile, I cut string long enough to span each banner with a small gap between and extra for tying off at the ends. After the glue was in place, I came along and pushed the string into each bead of glue. We let it dry over night and by the next day we had a truly heart-warming Valentine banner to hang about the house.

If watching your youngest glue paper bags to his fingers, the table and the cat is not your idea of a good time, you might try one of these alternative methods. 1) Punch a hole at the top of each side of your banner pieces and run the string through the holes to create your finished banner. 2) Fold the top of each banner piece over the piece of string and staple the flap in place to create your finished banner. Which ever finishing touch your choose, pick one that works best with your child’s taste and strengths (and your mama mess index).

Page 9 of 13
1 7 8 9 10 11 13