Category: Inside & Out

A look at what’s going on at the Home at the Quarter-Acre Wood

Age Terracotta Pots the Quick and Easy Way

Age Terracotta Pots the Quick and Easy Way

As Spring arrives and folks think about planting, I’ve noticed a lot of attention has been focused on terracotta pots and how to age them for a more classic look. I’ve read several tutorials on how to get that wonderful white water scale look and to be quite frank many of them seem completely over-complicated without achieving much more than a simple white wash technique will provide. I’m not trying to belittle the creative ideas of others, but I do want to share with you a quick and easy way to achieve an aged look with water and acrylic paint in literally just a couple of minutes.

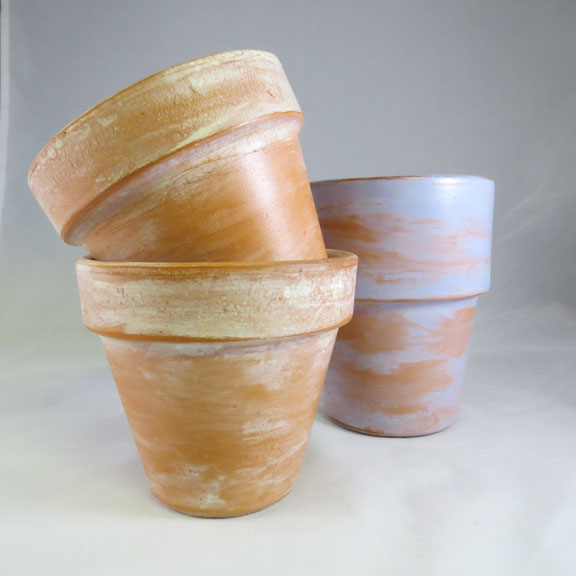
Pictured here are a few pots I painted this weekend, and it took just minutes to achieve the look. I used an off-white paint on two of the pots and a periwinkle paint on the other for a touch of whimsy. Keep reading (although it might take longer to read this post than it will to paint your pots) to see how I achieved the look.

pots


Materials Needed:

  • acrylic paint (use a white or off-white for the classic lime scale look)
  • water
  • small sponge brush
  • paper towel
  • sand paper (optional)

Directions:

  1. Put a few dollops of paint in a mixing container — I used a small solo cup. Add about a 1/4 cup of water to the paint and stir together well. It should be the consistency of water, but if you feel that you don’t have enough color, add a bit more paint.
  2. Starting at the rim of the pot, paint on the paint/water mixture. Work quickly, covering the rim first and then move onto the pot base.
  3. As soon as you coat the entire pot, use a paper towel to wipe off much of the paint beginning with the base and moving up to the rim. The rim should naturally have a bit more color than the base, so working in this direction aids with achieving that look.
  4. If you can’t get off enough paint, lightly wet your paper towel and continue wiping.
  5. After your pot is dry, If you still want to take off a bit of extra paint, lightly sand in spots with a piece of fine sandpaper.

For a bit of extra protection, I sprayed my pots with a matte spray sealer. While it gives the finished look more staying power, it does detract from the naturally aged look you’ve just achieved. You just might want to think about how and where you plan to use your pots before you spray.

Monogrammed Side Table a Snap

Monogrammed Side Table a Snap


sidetablebeforetable

I had this little table hanging out around my house for about a year before I decided to give it a face lift. It had been outside, inside, held pumpkins and mums, and had been just plain ugly the entire time. With the purchase of new living room furniture, I decided it would find a final resting place as a side table (but it still needed major help). I actually used flat black spray paint on this project because of all the spindley things — getting a smooth coat of paint on that was not something I was looking forward to doing with a brush. Before I sanded and painted, I put my Cricut machine to good use and cut a monogram letter out of sticker paper for the top. After spraying the entire piece, I peeled off the sticker, sanded some more and waxed the entire piece. . . and it really was just about that easy, and quick (once I decided its fate).

A Pair of DIY Projects on Parade

A Pair of DIY Projects on Parade

Today I’m sharing a couple of recently completed DIY projects for the September Sapphire Even Day Blog Challenge (I’m going to call it the “Even Day Challenge” for the rest of the month just so I don’t leave anything out). I love a good deal and I love furniture, so taking something from trash to treasure is a great deal of fun and/or rewarding for me. Believe me, I’m not above pulling out an old chair or chest of drawers from someone’s road-side trash pile.

These two projects are just small little things that were quick and easy to complete. For most of my furniture pieces I use sand paper, flat paint and soft wax. With these three tools I can quickly redo a table, chair or cabinet from start to finish; adding the extras is where it takes time, attention and a bit of product testing.

Project #1 – Pair of BEEutiful Children’s Chairs

childchairsafterchildchairsb4

These wobbly white children’s chairs cost $7.00 for the pair, and with the tightening of a few screws, a coat of paint and the addition of a beautiful bee graphic from The Graphic’s Fairy, they became a great resale product for an antique store. You can read the whole story on how I transformed these cute little things on my blog. Just one word of advice, experiment with your own chalk paint BEFORE you start painting.

Project #2 – Monogrammed Side Table

sidetablebeforetable

I had this little table hanging out around my house for about a year before I decided to give it a face lift. It had been outside, inside, held pumpkins and mums, and had been just plain ugly the entire time. With the purchase of new living room furniture, I decided it would find a final resting place as a side table (but it still needed major help). I actually used flat black spray paint on this project because of all the spindley things — getting a smooth coat of paint on that was not something I was looking forward to doing with a brush. Before I sanded and painted, I put my Cricut machine to good use and cut a monogram letter out of sticker paper for the top. After spraying the entire piece, I peeled off the sticker, sanded some more and waxed the entire piece. . . and it really was just about that easy, and quick (once I decided its fate).

Page 15 of 17
1 13 14 15 16 17