Category: Craftiness

General craft ideas, including sewing projects, kid-friendly ideas and VBS inspiration.

One Boy’s Valentine Banner

One Boy’s Valentine Banner

Valentine banner

Yesterday I told you that my three-year-old son and I spent part of our snow day creating a cute little Valentine project, so today I thought I would share our kid-friendly craft with all of you (especially if you’re still stuck inside from this week’s storm). I came up with this quick banner idea by combining a couple of Pinterest projects with some of my son’s favorite things — paint and glue.

To create your own Valentine banner you will need:

  • brown paper lunch bags
  • empty toilet paper/paper towel roll
  • red washable paint
  • scissors
  • glue
  • string

To begin the project, cut a paper bag right above the bottom fold. Then cute along the two outside edges to give you two rectangular banner pieces. If you want, you can cut a triangle out of each of those pieces or just leave them square on the bottom. Cut as many bags as you desire for your project. If your child is old enough to handle the scissors, great but make sure an adult supervises this task (I let my three year old, cut on some scrap pieces, but he wasn’t up for the first part of this project).

TPheartstamp2
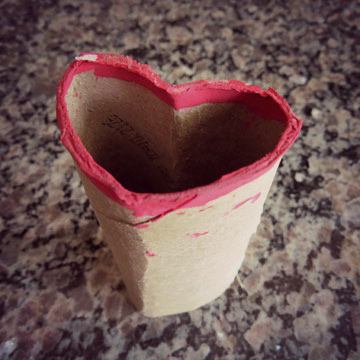
Next, shape the empty toilet paper roll into a heart. I started by creasing the top inward, being carefully not to make creases in the rounded parts of the heart, and then I creased the bottom point of the heart. After you have the shape to your liking, pour some washable paint on a paper plate. Have your child grasp the TP heart roll around the middle to hold its shape, dip an end into the paint and stamp it onto each banner piece. Your child can redip as necessary.

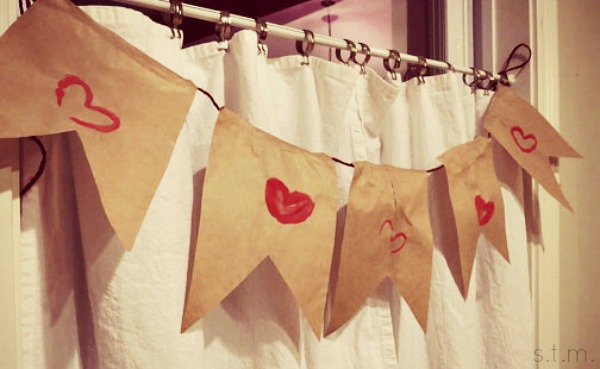
After the paint dries, flip over each banner piece and run a bead of glue along the top of each one. My son loved doing this and it really didn’t matter that he got a little sloppy (you might want to cover your work space before this step). Meanwhile, I cut string long enough to span each banner with a small gap between and extra for tying off at the ends. After the glue was in place, I came along and pushed the string into each bead of glue. We let it dry over night and by the next day we had a truly heart-warming Valentine banner to hang about the house.

If watching your youngest glue paper bags to his fingers, the table and the cat is not your idea of a good time, you might try one of these alternative methods. 1) Punch a hole at the top of each side of your banner pieces and run the string through the holes to create your finished banner. 2) Fold the top of each banner piece over the piece of string and staple the flap in place to create your finished banner. Which ever finishing touch your choose, pick one that works best with your child’s taste and strengths (and your mama mess index).

From T-Shirt to Self-Tying Paint Smock

From T-Shirt to Self-Tying Paint Smock

paintsmock
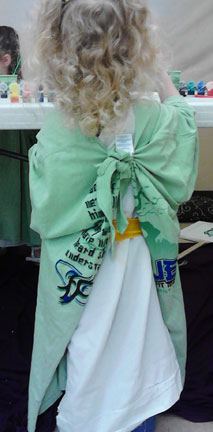
Okay, so it’s not often that I have a completely original idea, so here’s one for the books. . . or the blog, or however the saying must go in today’s electronic age. It’s not like it’s an earth shattering discovery or anything, but it sure did make last week’s VBS painting projects much less messy.

I picked up several extra large t-shirts from my Mom’s church for a buck each and planned to use them as paint smocks, but I didn’t think the children would appreciate us pulling them on and off their heads each day so I started thinking about an easy way to make them into backwards vests that somehow stayed on their little bodies. I wanted them to have ties in the back, but I just didn’t have the time or gumption to do a sewing project involving that many shirts.

Suddenly the thought occurred to me that perhaps there was a way to cut the shirts themselves so that they would be equipped with built-in ties, and that’s when this idea was born (now if I’m the last VBS craft girl on the planet to ever think of this, please tell me now so that I’ll stop being so darn pleased with myself).

Materials:

  • good pair of scissors (I keep a couple of pair just for material)
  • t-shirt

cuthereDirections:

  1. Lay the t-shit flat on a hard surface with the back facing up.
  2. Cut straight up the entire back of the shirt from hem to neckband.
  3. Flop the shirt over to the front and cut a slit just through the center of the neckband.
  4. Then cut around the neck band toward the back of the shirt on both sides, stopping about an inch and a half from cutting off the entire neck band on each side.
  5. These little flapping pieces of neckband will now be your ties.

Just have your child(ren) put on the shirt with the open slit at the back and use your two pieces of neckband to tie a loose knot at the top. That’s just how easy it is to make a mess-saving painting smock.


Shared at:
Wow Us Wednesdays @ Savvy Southern Style


Laurel Wreaths Three Ways

Laurel Wreaths Three Ways

Our Vacation Bible School theme this year is “Escape to Athens with Paul,” so all the children and adults have been donning togas and laurel wreaths for the week — nothing like getting into character. While a friend made the “fancy” wreaths for all the workers, it was just too expensive of a project for all the kids to create. So in the interest of sticking to a budget (it’s VBS after all), I came up with a couple of inexpensive wreath alternatives, one for the older children and another for the youngsters.  I think the kids enjoyed making their own wreaths, but with the everyday use I have noticed a few stray leaves here and there.

We’ll start with the easiest and least expensive wreath and work our way up from there.

wreath1Wreath #1:

  • construction paper
  •  glue sticks
  •  wrapping tape

Cut strips of construction paper 3/4 inch thick for the headband portion. Measure the circumference of each child’s head and trim accordingly, but don’t tape closed at this point. Cut out 14 leaves for the each wreath (I used a very simple leaf shape that I drew, because we literally cut out hundreds of these things). Using the glue stick, add the leaves to the band starting at the back and working forward. This works best if each new leaf is glued under the previous leaf, but our kiddos stuck them on every which way and they turned out really cute. Once all the leaves are glued on, use the wrapping tape to close the wreath loop and that’s it. Our four- and five-year-old kids made this type of laurel wreath, and even our older nursery children managed these with a little assistance.

wreath2Wreath #2:

  •  plastic headbands
  •  construction paper
  •  glue dots

I love the way these laurel wreaths turned out, and they look adorable placed backward on the head so that the leaves wrap toward the face — very authentic. Again, we used 14 leaves for each wreath and used gluedots to adhere them. For the best effect, start at the back and work toward the front, placing each new leaf under the previous one (or however your kids decide to do it). The first through sixth graders made this type of wreath, but the younger kids had a bit of trouble with the glue dots. By the way, I found cheap four-packs of headbands at the dollar store.

wreath3Wreath #3:

  •  medium gauge floral wire
  •  silk ivy vines
  •  green floral tape

We (okay, not me — thanks Morgan) made these wreaths for all the VBS workers to wear during our week in Athens. This project was not extremely expensive but I felt it was too much for our craft budget, thus the alternative wreaths #1 and #2 shown above.

Use your head as a general pattern to cut the lengths of floral wire and ivy vines. The finished product will just set on top of your head so the size doesn’t have to be exact. Twist the ends of the wire together to make a circle and wrap the ends with floral tape. Then wrap the wire loop with your ivy vine and adhere by wrapping both the wire and ivy vine together with the floral tape. That’s it — it’s super easy but can be a bit time consuming if you need to make several.

I hope you’ve found at least one of these ways to be suitable for making your own laurel wreaths, and good luck ”being Greek.”

Page 12 of 13
1 10 11 12 13