Tag: In the Kitchen

“Show Us Your Pyrex” Party

“Show Us Your Pyrex” Party

pyrex100-banner

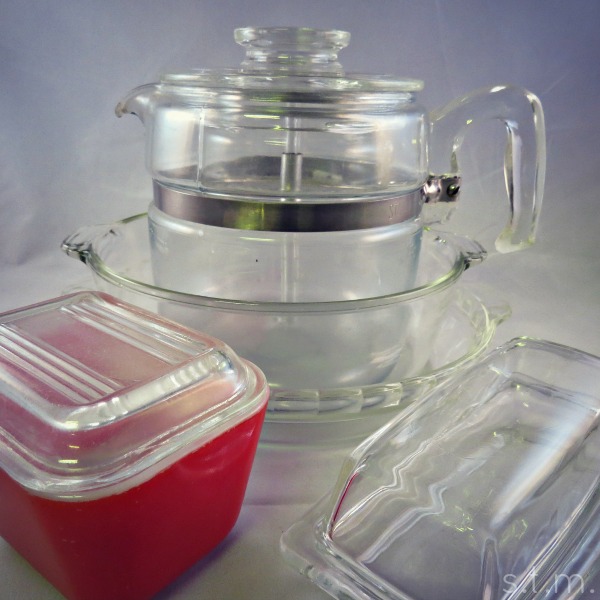
As many of you may know, Pyrex (the long-lived favorite of the American kitchen) is turning 100 this year. If you’re like me, you still use your tried and true Pyrex baking and storage dishes regularly and have no thoughts of retiring them anytime soon. If you’re also like me, you own a classic piece or two that is way out of date, but somehow whipping it out for church potluck or special events always floods your heart with good memories . . . especially if you grew up in a family where your mama sure knew how to cook (and did).

mypyrexIn celebration of the “Big Hundred,” Pyrex is putting on their party hats and blowing the horns with a nation-wide measuring cup tour and great giveaways during the next few months. If you want to get in on the action, visit their site to enter and see where they might show up next.

Now for the real fun! In fabulous birthday fashion, Small Talk Mama is hosting a “Show Us Your Pyrex” party right here for the next few months. Take photos of your favorite Pyrex and post them at the linked party below so that we can all admire and covet what you have in your kitchen.

So I guess this is where I’m suppose say, “I’ll show you mine, if you show me yours.”

 Loading InLinkz ...
My Saltine Packin’ Sister’s Spicy Ranch Crackers

My Saltine Packin’ Sister’s Spicy Ranch Crackers


crackers

My sister came bearing these utterly yummy and completely addictive seasoned crackers when she arrived at our doorstep last week; and after consuming her two bags (okay, I had some help) and making three additional batches, I just had to share this super-easy recipe with all of you.

Spicy Ranch Crackers
A spicy flavored snack made with ordinary saltine crackers.
Write a review
Print
Prep Time
15 min
Cook Time
25 hr
Total Time
40 min
Prep Time
15 min
Cook Time
25 hr
Total Time
40 min
Ingredients
  1. 2 sleeves of saltine crackers
  2. 3/4 cup canola oil
  3. 1 pkg dry ranch dressing mix (not dip mix)
  4. 1 tbsp. red pepper flakes
Instructions
  1. Preheat oven to 250 degrees.
  2. In a gallon zip bag, combine all the ingredients and blend well using your hands.
  3. Put one sleeve of crackers in the bag and carefully coat the crackers. Then add the second sleeve and also coat.
  4. Let the full bag of crackers sit flat for five minutes. Then flip the bag over and let it sit for another five minutes.
  5. Pour the bag of crackers out on a large cookie sheet.
  6. Bake for 15 minutes.
  7. Remove from oven. Shuffle and flip crackers with a spatula.
  8. Bake for an additional 10 minutes.
  9. Place crackers on a cooling rack for several minutes.
  10. Store in an air-tight container.
Notes
  1. If this recipe is too spicy, simply cut back on the red pepper flakes to your taste.
Adapted from Shari Willis
https://www.smalltalkmama.com/
Jell-O Playdough, Recipe for Homemade Fun

Jell-O Playdough, Recipe for Homemade Fun


playdough1

We finally tried the Jell-O playing dough thing this weekend, and mom and son gave it two thumbs up. . . oh, and also dad, because he actually gave it the taste test since it smelled so good (not like he snacked on it, just a nibble). We used the recipe from Modern Parents, Messy Kids, but I have seen similar recipes all over the web.

We made raspberry dough because I had it on hand, which made the pinkish red colored dough that you see here. My son enjoyed mixing all the ingredients together, but quickly tired of the stirring and kneading steps; although he magically reappeared for the play/testing phase. The cooking process didn’t take that long, just remember to keep stirring until you really can’t stir any longer. Also, I probably kneaded an additional cup of flour into the dough to get rid of the stickies, so just keep “kneading it in as needed” (ha, get it). When it was finished, I admit I was completely surprised by how much it actually felt like the real thing, and this recipe makes enough for at least a couple of kids to enjoy.

playdough2

Our son played with his newest creation for over an hour Saturday afternoon, and afterwards, we plopped it into an airtight container and put it in the refrigerator until the next play day. According to Modern Parents, Messy Kids, the playing dough should last at least a few weeks if properly stored in the fridge.

So if you have a hankering for some homemade fun, here’s the recipe you should use:

Jell-O Playdough
Homemade playdough that feels like the real thing.
Write a review
Print
Prep Time
10 min
Cook Time
20 min
Total Time
40 min
Prep Time
10 min
Cook Time
20 min
Total Time
40 min
Ingredients
  1. 1 c white flour
  2. 1 c warm water
  3. 2 tbsp. salt
  4. 2 tbsp. cream of tartar
  5. 2 tbsp. cooking oil
  6. 1 Jello pack (3 oz.)
  7. extra flour for kneading
Instructions
  1. Mix all of the ingredients (except extra kneading flour) together in a small saucepan until the lumps are gone.
  2. Cook over medium heat, stirring continuously until it thickens into a big ball of dough. (Stir until you can't stir anymore.)
  3. Turn out the dough on a flour covered surface, cutting board or mat.
  4. Let the dough cool.
  5. Add flour and knead the dough until it is no longer sticky (1/2 cup to 1 cup of flour).
Notes
  1. The dough should stay good for a few weeks if placed in an airtight container and kept in the refrigerator.
Adapted from Modern Parents, Messy Kids
https://www.smalltalkmama.com/
 Shared at:
Green Willow Pond


Page 8 of 12
1 6 7 8 9 10 12