Tag: In the Kitchen

Jumping on the Breadmaker Bandwagon: Better (30 Years) Late, Than Never

Jumping on the Breadmaker Bandwagon: Better (30 Years) Late, Than Never

bread machine bread

I have this friend. She makes bread. She makes a lot of bread. She is absolutely the only person I have ever met that has used one of those chunky space-hogging bread machines more than twice. In fact, she recently started making hamburger buns and English muffins with her big ol’ bread making device and has been raving about how healthy (minus the preservatives and additives of store-bought loaves) and delicious everything tastes.

So I started rethinking my view on bread machines. I never realized I could make anything other than a square-ish lump of bread with one of these contraptions. Oh no, I could make dinner rolls, sweet breads, pretzels, buns, crescents and more. Apparently if you have a dough setting on your machine it will do all the hard work for you (mix, knead, wait, repeat) and you can then separate it and shape it however you choose. Who knew?

So, it didn’t take me long to jump on the fresh-baked bread wagon (not counting the thirty plus years since the great bread-making outbreak of the 1980s). On a quest to try it before I wasted a lot of money on it, I found a very nice (and cheap) machine, complete with manual and how-to video on VHS, at a church rummage sale this weekend. After giving it a quick clean and buying a few ingredients, I am proud to say I served my family tuna salad sandwiches on freshly baked wheat bread this evening. Yumm-E!

breadmaker
Yea baby! My “new” Regal Automatic Breadmaker, Model K6776, is awesome.

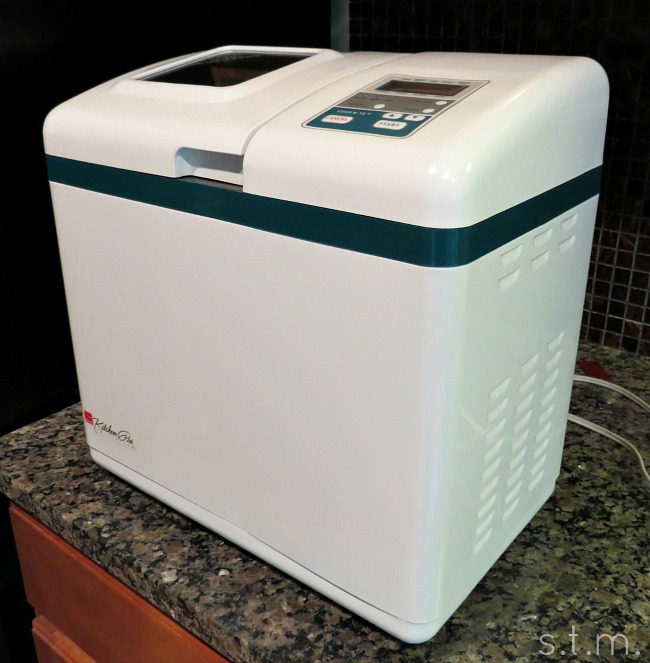
This clever invention is awesome! Just pour in the ingredients, push a few buttons. . . and run back and forth watching the ingredients become bread through the small little glass window on top. I was like a kid at Christmas. So here’s a thought for all you folks who have a bread machine stuffed way back somewhere in your kitchen abyss — dust it off, plug it in and enjoy some fresh baked bread this week. Maybe you will remember why you originally bought it. . . and if you remember why you never used it, donate it to some poor soul who suddenly has decided to give this phenomenon a go.

A Real Mom’s Kitchen — Cassandra Creates Eclectic Vibe on a Budget

A Real Mom’s Kitchen — Cassandra Creates Eclectic Vibe on a Budget


A Real Mom's Kitchen

Today’s Real Mom’s Kitchen belongs to Cassandra W. She’s a MOMS Club® friend of mine and I have visited her 50s eclectic vintage vibe home many times so I kind of knew what to expect from her kitchen, but learning the story of its transformation was a lot of fun.

a real mom's kitchen - cassie

A Real Mom's Kitchen - Cassie

Other than being a stay-at-home (most of the time) mom, Cassandra is an actor, wedding planner, graphic designer, belly dance instructor and adjunct professor. Makes you tired just reading it, doesn’t it? So where she and her husband had the time to remodel anything, I’ll never know; but this kitchen is testament to the sheer will of a do-it-yourselfer. “My whole kitchen is DIY,” Cassandra admits, and from top to almost bottom (because they haven’t yet tackled the floors) this kitchen has felt her creative touch.

IMG_5937

From the deep purple walls, glossy black countertops and once light oak cabinets, this kitchen has seen quite the transformation and hours of sweat equity. The countertops alone received six coats of color and two coats of a poly acrylic. One of my favorite transformations is the back splash, which is painted a nice bright white. Want to know what it looked like before? Just take a good look at the floor. . . yes, I said floor. Apparently the previous owners had painted the back splash to match the floor, but Cassandra rectified that little decorating misstep rather quickly.

IMG_5942
 What I love most about her kitchen is the unusual shape that is so unique and makes for a rather large space, but Cassandra’s favorite thing is the island. This storage and work space at the far end of her kitchen was a complete DIY build from items found at one of her (and my) favorite places, Habitat for Humanity’s Restore. She pieced together a reasonably priced and functional island with a granite top by shopping at this second-hand builder’s warehouse, and the result is beautiful.

IMG_5940

Speaking of granite tops, Cassandra admits she likes the look of granite but the jury is still out on what she will buy when the time comes to replace her current countertops. As far as stainless steel goes, her response was a definitive, “Oh yes;” although she admits that the new black stainless steel is quickly capturing her heart.

“I’m all about unique,” remarked Cassandra, and I’m sure she will build on this decorating approach as she tackles her list of coming projects for this room. She wants new countertops, back splash and knobs, but also high on her list is to remove the old wall oven unit and install a new floor.

IMG_5936
IMG_5922
 While this busy mother of one adorable almost two-year-old girl named Dahlia seems to find time to express her creativity in her home and work, she admits that cooking is not one of her favorite things to do. “If we could afford for me not to cook, we would do that more often, ” said Cassandra, but she also added that with a tight budget she has learned to enjoy cooking more than she used to. Making food for her daughter is one of her favorites, but planning meals on a weekly basis has also helped take the “brain power” out of preparing family meals.

Luckily, Cassandra is sharing one of her favorite go-to recipes with us as we wrap up her wonderful DIY kitchen tour. It’s a homemade spaghetti sauce recipe handed down from her grandmother, and Cassandra uses it for everything that calls for a red sauce, like spaghetti, pizza, etc. I personally can’t wait to give this one a try.

Spaghetti Sauce
A red tomato sauce that can be used for spaghetti, pizza, etc.
Write a review
Print
Ingredients
  1. 1 can tomato sauce
  2. 1 can tomato paste
  3. garlic powder
  4. onion powder
  5. basil
  6. oregano
  7. 1 bay leaf
  8. Italian seasoning
  9. 1 tbsp. butter
Instructions
  1. Melt butter in sauce pan on medium heat.
  2. Add tomato sauce and tomato paste to the pan. Fill paste can with water and add to the pan. Stir together.
  3. Add one bay leaf.
  4. Add enough Italian seasoning, oregano and basil to lightly cover the top of the sauce.
  5. Add onion and garlic powder to taste.
  6. Cover and let the sauce simmer on low heat until ready to serve.
Adapted from her grandmother
https://www.smalltalkmama.com/
A Playing Dough Kind of Day

A Playing Dough Kind of Day

playing dough

It was a play dough making kind of day! With a gray chill in the air, my little guy and I decided to hole up at home, crank the heater and have a little fun.  My son requested orange dough the other day, so I snagged a cheap box of said-colored gelatin during my last grocery shopping trip and was thankful to have it on hand.

My little guy loves to mix all the ingredients for this gelatin-based recipe and even stir for a bit, but it doesn’t take long for his little arms to get tired and relinquish the spoon to mama. I really don’t blame him; even my arms get tired before the dough completely cooks. The key to this recipe is to just keep stirring as it cooks — it will set up, eventually.

playing dough

If you’re looking for some creative ways to spend the last several chilly days of winter, you might give this playing dough recipe a go. It’s not cheaper than buying the original stuff at the store, but it is a lot more fun.

Jell-O Playdough
Homemade playdough that feels like the real thing.
Write a review
Print
Prep Time
10 min
Cook Time
20 min
Total Time
40 min
Prep Time
10 min
Cook Time
20 min
Total Time
40 min
Ingredients
  1. 1 c white flour
  2. 1 c warm water
  3. 2 tbsp. salt
  4. 2 tbsp. cream of tartar
  5. 2 tbsp. cooking oil
  6. 1 Jello pack (3 oz.)
  7. extra flour for kneading
Instructions
  1. Mix all of the ingredients (except extra kneading flour) together in a small saucepan until the lumps are gone.
  2. Cook over medium heat, stirring continuously until it thickens into a big ball of dough. (Stir until you can't stir anymore.)
  3. Turn out the dough on a flour covered surface, cutting board or mat.
  4. Let the dough cool.
  5. Add flour and knead the dough until it is no longer sticky (1/2 cup to 1 cup of flour).
Notes
  1. The dough should stay good for a few weeks if placed in an airtight container and kept in the refrigerator.
Adapted from Modern Parents, Messy Kids
https://www.smalltalkmama.com/
&

Page 5 of 12
1 3 4 5 6 7 12