Tag: DIY

Cheap and Easy Holly Hangers

Cheap and Easy Holly Hangers

hollyhanger1hollyhanger2

I’m going to let you in on a little secret of mine, because who doesn’t love cheap and easy. Whoa now, I’m not sure you’ll find this little tip quite that interesting, but if you are looking for an inexpensive and extremely quick way to hang holiday decorations on mirrors and pictures, then you’ve come to the right place.

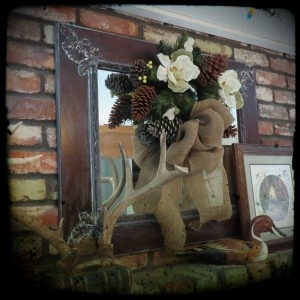
A few years ago while my husband was sorting outdoor lights and I was festivizing the living room, I decided to hang a cute little wreath (pictured at left) in front of the mirror over the fireplace. I didn’t know how best to go about this without scratching the mirror or poking holes in the wall, until. . . until I spied an orphaned light hanger that had fallen off my husband’s project. Speaking of lights, one suddenly went off in my head.

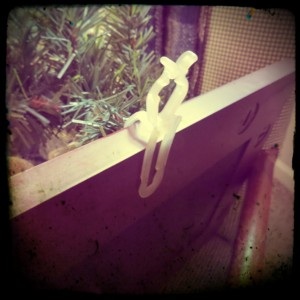
I took this one little plastic hanger, you know the kind you can buy for cheap that attach to outdoor lights and slide under roof shingles or clip on gutters, turned it upright and attached it to my wreath. I then simply slid the part that is supposed to go on the gutters or shingles over the top of my mirror. It was a perfect fit!

Obviously if you have a seriously chunky frame on your mirror, the clip won’t fit; and in that case I’m going to leave you hanging (no pun intended). But for most simple frames, this technique should work fine. Also, if the little “rabbit ears” on the clip stick up above your wreath or bow, simply trim off that portion of the clip.

Monogrammed Side Table a Snap

Monogrammed Side Table a Snap


sidetablebeforetable

I had this little table hanging out around my house for about a year before I decided to give it a face lift. It had been outside, inside, held pumpkins and mums, and had been just plain ugly the entire time. With the purchase of new living room furniture, I decided it would find a final resting place as a side table (but it still needed major help). I actually used flat black spray paint on this project because of all the spindley things — getting a smooth coat of paint on that was not something I was looking forward to doing with a brush. Before I sanded and painted, I put my Cricut machine to good use and cut a monogram letter out of sticker paper for the top. After spraying the entire piece, I peeled off the sticker, sanded some more and waxed the entire piece. . . and it really was just about that easy, and quick (once I decided its fate).

A Pair of DIY Projects on Parade

A Pair of DIY Projects on Parade

Today I’m sharing a couple of recently completed DIY projects for the September Sapphire Even Day Blog Challenge (I’m going to call it the “Even Day Challenge” for the rest of the month just so I don’t leave anything out). I love a good deal and I love furniture, so taking something from trash to treasure is a great deal of fun and/or rewarding for me. Believe me, I’m not above pulling out an old chair or chest of drawers from someone’s road-side trash pile.

These two projects are just small little things that were quick and easy to complete. For most of my furniture pieces I use sand paper, flat paint and soft wax. With these three tools I can quickly redo a table, chair or cabinet from start to finish; adding the extras is where it takes time, attention and a bit of product testing.

Project #1 – Pair of BEEutiful Children’s Chairs

childchairsafterchildchairsb4

These wobbly white children’s chairs cost $7.00 for the pair, and with the tightening of a few screws, a coat of paint and the addition of a beautiful bee graphic from The Graphic’s Fairy, they became a great resale product for an antique store. You can read the whole story on how I transformed these cute little things on my blog. Just one word of advice, experiment with your own chalk paint BEFORE you start painting.

Project #2 – Monogrammed Side Table

sidetablebeforetable

I had this little table hanging out around my house for about a year before I decided to give it a face lift. It had been outside, inside, held pumpkins and mums, and had been just plain ugly the entire time. With the purchase of new living room furniture, I decided it would find a final resting place as a side table (but it still needed major help). I actually used flat black spray paint on this project because of all the spindley things — getting a smooth coat of paint on that was not something I was looking forward to doing with a brush. Before I sanded and painted, I put my Cricut machine to good use and cut a monogram letter out of sticker paper for the top. After spraying the entire piece, I peeled off the sticker, sanded some more and waxed the entire piece. . . and it really was just about that easy, and quick (once I decided its fate).

Page 4 of 5
1 2 3 4 5