Tag: DIY

From Free to My Front Porch

From Free to My Front Porch

front porch chairs

Here’s a quick little project I recently finished that cost me next to nothing, thanks to one of my favorite shopping spots — Mom’s house.

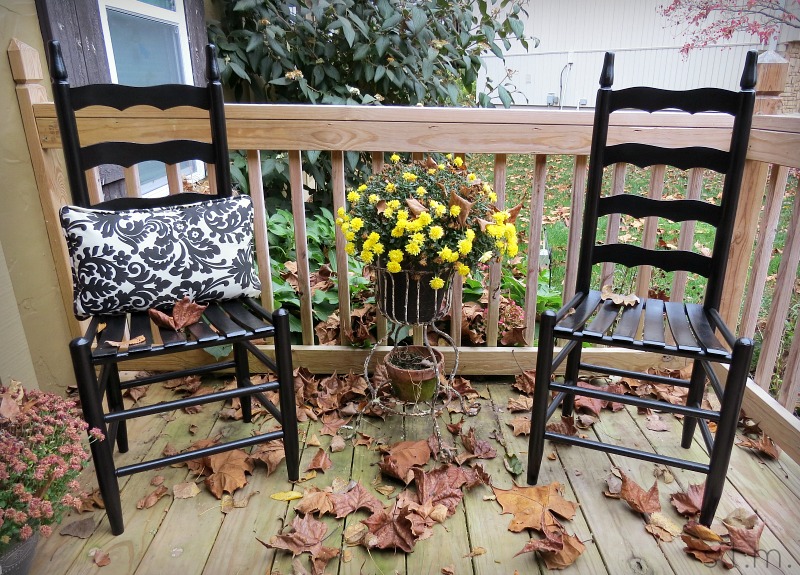
I went to Oklahoma a few weeks ago to help Mom with a garage sale she had been threatening to hold for quite some time, and lucky for me two old green chairs were still standing at the end. Instead of donating them to a local charity, she donated them to me. Oh. When I put it like that I feel a little guilty (but they do look super cute on my front porch).

front porch chairs

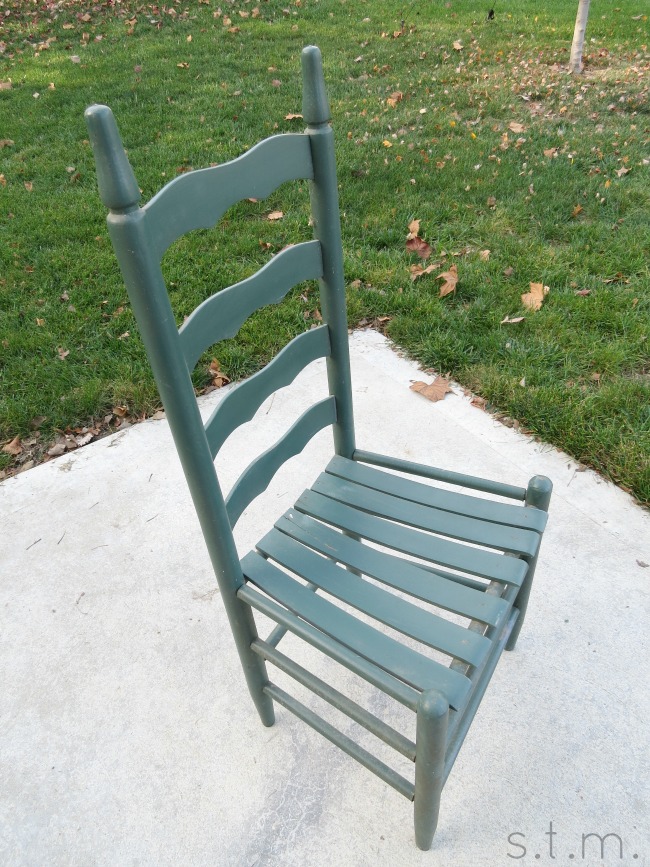
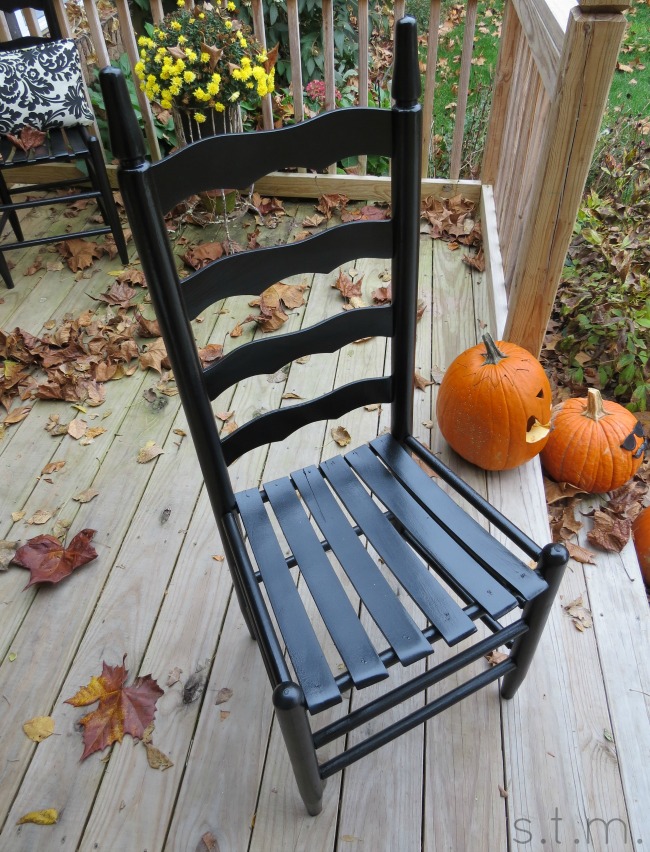
I carted home these ugly green things in need of a little TLC and quickly got to work while the weather was still warm. My husband repaired a couple of slats, I gave them a good cleaning and after three cans of glossy black spray paint ($12), this pair of chairs is perfect on my front porch. Thanks Mom!

front porch

Trash Bag Jellyfish

Trash Bag Jellyfish

trash bag jellyfish

In a quest to create something cheap and easy for this year’s “Submerged” Vacation Bible School theme,  I found this wonderful trash bag jellyfish project on, where else, Pinterest. These cute little sea creatures have been taking over my home for a week now and I simply love their ethereal presence all around our decorated church. Along the way I discovered that these fun little sea creatures have been assembled in many different ways by several different folks, but I wanted to share with you exactly what worked for me.

trash bag jellyfish

Start with two trash bags. I used opaque ones, translucent ones, pink ones and blue ones. Any old bags will do, but I think my favorites were the cheap pink ones I found at the dollar tree. They have a light and airy feel and the color is perfect for jellyfish, but this is VBS and we can imagine jellies in any color we choose.

Before I started making my jellyfish, I created a few hangers for the little guys by cutting up some fishing line (length depends on personal preference and hanging location), tying it in a loop and attaching a paperclip. I made several of these hangers ahead of time, because this is the boring and kind of time-consuming part of the project.

To make the top of the jellyfish,  I used one bag, one rubber band and one paper clip hanger. Fluff a bag in the air to completely open it up and then gather the open edge of the trash bag in your hand as if you were making a air-filled bag to pop; although you don’t want to fill it completely or the next step won’t work.

With the gathered bag in one hand, push the natural bottom of the bag down into the middle and into the gathered hand. Some trash bags have a straight seam, which means you will also have to tuck the two corners down into that gathered hand as well or your jellyfish will end up with ears. . . and as far as I know jellies don’t have ears. 

Now take a premade hanger and push the paperclip down through the middle and into the gathered hand. You should be able to feel the paperclip in your hand, but the fishing line should be sticking out the top. Secure everything in your gathered hand with a rubber band, making sure the paperclip is anchored in place below the rubber band. You should end up with an air-filled bagel-shaped bag with fishing line out the top.

trash bag jellyfish

Now onto the tentacles. To make long, flowing tentacles you need to start with your second trash bag. Cut off all the seams and corners, but keep the two layers together. Using a pair of scissors, cut a spiral shape from the outside in. You can cut this as thin or thick as you like, but I think the skinny version isn’t quite as pretty. After you cut the spiral, pull apart the layers and let them hang. The spiral cut is essential to the long flowing look, so don’t cut corners — I tried it.

trash bag jellyfish

Cut the tentacles to desired length and push one end through one of the rubber band loops already in place on the jellyfish body. If you want to add more layers, simply cut another trash bag or add some other types of materials to achieve a fuller look. I used everything from tulle, ribbon and unraveled cheap plastic leis from the dollar store.

One of my favorite things about this project is that all my trash bag jellyfish seem to have their own unique personality — some were fun, some were beautiful and some were just plain silly.

From Floor to Table:  Easy Drop Cloth Table Runner

From Floor to Table: Easy Drop Cloth Table Runner

drop cloth table runner

I have a larger-than-most dining room table in my home, coming in at just under eight feet long when both drop leaves are up and over three feet wide to boot. Needless to say, it can be difficult to find the right type and size of table runner for the dining room so I decided to whip up one of my own using a spare drop cloth and a few quick stitches.

Let me start by clueing you in on my inspiration for this project, other than the fact that I had all the supplies and knew it wouldn’t get much quicker or easier than this. I follow a small home and lifestyle blog called Little Farmstead and Julie is always sharing photos of her beautiful and cozy house. In one of her recent posts she showed a close-up photo of her table, complete with runner, and that’s when the light bulb went off in my head. While it looks as if her table dressing is perhaps made of linen, I had a drop cloth and so I gave it a go.

To make my little (or actually rather large) runner, I decided on a width and length for the finished piece,  used scissors to make snips and simply tore the cloth at the cuts to create the finished dimensions. With my sewing machine, I stitched two close lines about a quarter-inch from the frayed edge along the entire length of all four sides, and that was it. I used a matching thread for stitching, but I think a contrasting thread would add a cute little pop of color.

drop cloth table runner

So there you have it — my drop cloth turned table runner. It just doesn’t get much easier than that, and I gotta say I’m diggin’ it (even the hubs piped up with a compliment).

Page 2 of 5
1 2 3 4 5