Category: It’s Fall Y’all

My Autumn Mailbox Adds Curbside Color

My Autumn Mailbox Adds Curbside Color

autumn mailbox

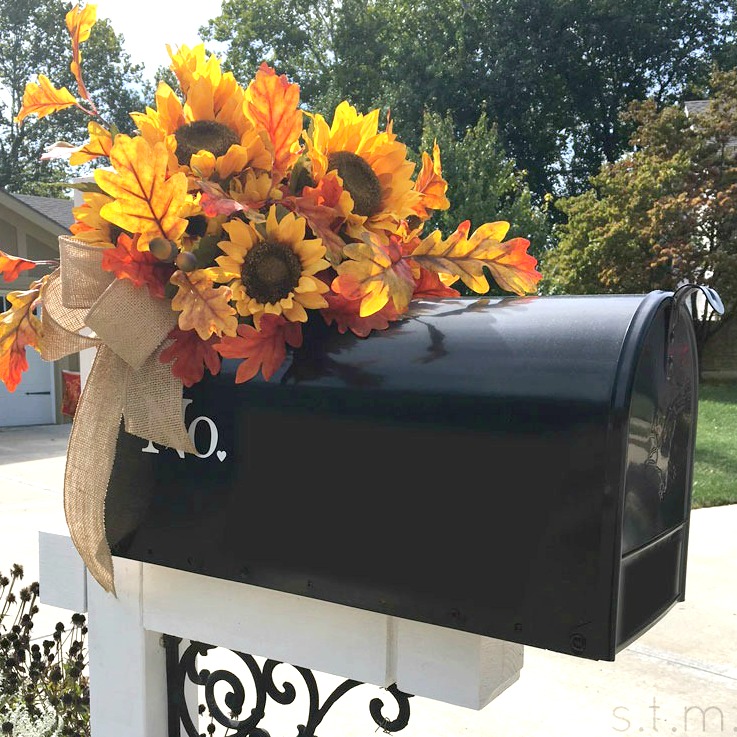
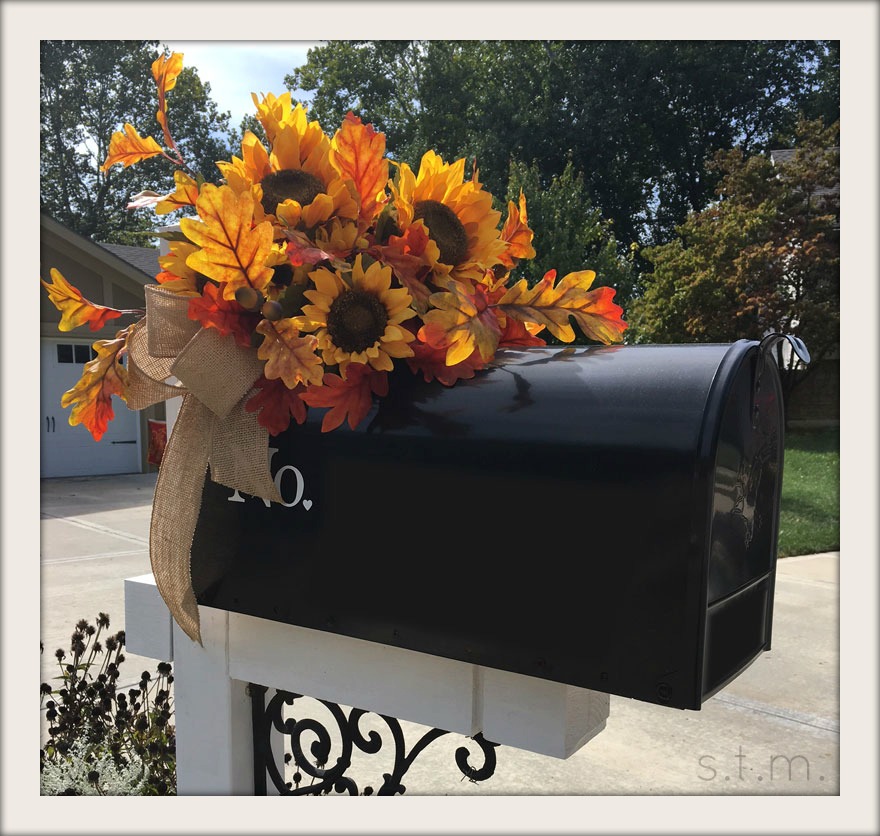
Although today’s cloudy skies looks nothing like the day I took these photos of my autumn mailbox, I decided to share them in hopes of bringing a bit of sunshine and inspiration into your day.

Since all the flowers around my mailbox have finished blooming, I’m left with a bunch of dead heads and green leaves, so I wanted to bring some color to the curbside. I will soon clip the dead flower tops once the yellow finches have polished off all the seeds before winter.

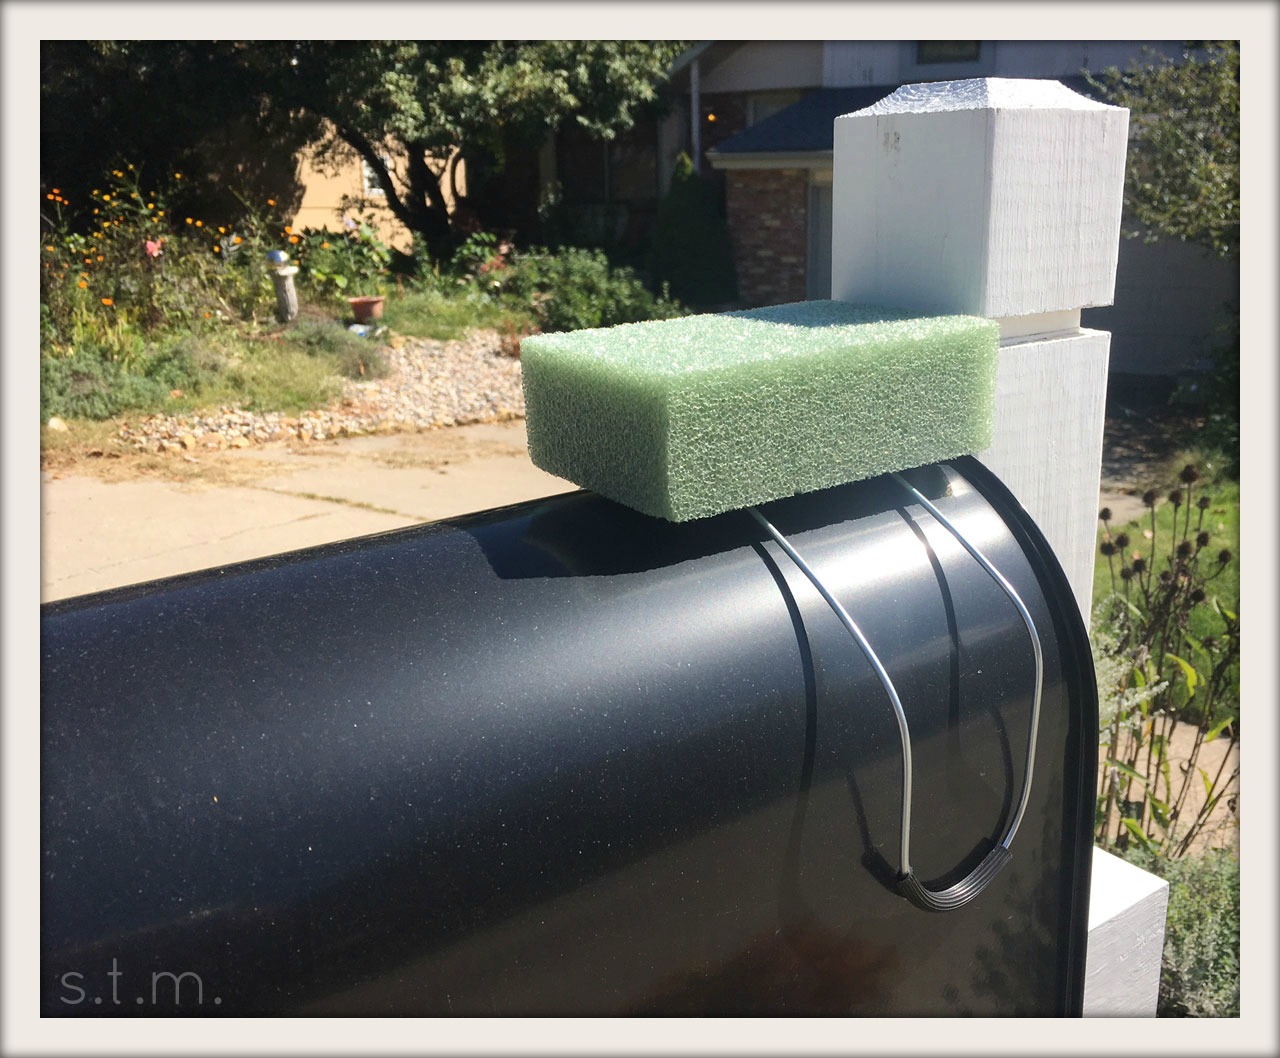
This little box top arrangement was super easy to create with just a few necessities. I started with a floral saddle created for just such a thing (and headstones too, but our project is much more fun). Bend the sides of the saddle to firmly grip your mailbox and wrap the foam with dried Spanish moss. You can purchase bags of the moss for cheap at most craft stores. You don’t need to adhere the moss with anything, because your floral stems will hold it on.

autumn mailbox

Now it’s time to start poking in your pretty stuff. I used one bush of sunflowers and one bush of oak leaves (on sale at Michael’s), but I also added some smaller flowers I had around the house to fill in some bare spots. You will need some type of wire nippers to trim the flower stems to length, and this is probably the most difficult step in this project. Those thick stems can be tough to cut, but with the correct tool you shouldn’t have a problem.

For the finishing touch, I added a large bow made of wired burlap ribbon to each side of the arrangement. I made the bows and adhered them using wired floral picks (also available at craft stores). The bows add a nice touch and also help cover the sides of the saddle.

That’s all it took to create this fun mailbox topper that should last until Christmas décor time, but I hope it withstands the elements well. I’m sure the quality of my contents will play a part in this, but so far the rain and wind haven’t affected it a bit.


Apple Pickin’ in the Orchard

Apple Pickin’ in the Orchard

apple pickin'

One of my favorite fall activities is apple pickin’ at Schweizer Orchards in St. Joe. We started this tradition when my son and I joined a mom’s group years ago, and both of us quickly took to the cool mornings, apple picking and picnicking with our friends. Unfortunately, my little guy is in first grade these days and most of our group outings are during the day, so that means no apple picking for him during the week (when all the fun stuff is not overly crowded). Fortunately for me I don’t mind, and neither it seems do the other moms, showing up to some of the good stuff without my child in tow. My husband calls me the MOMS Club® stalker. . .  He might be right, but I don’t care. Besides, who couldn’t use an extra set of hands when you’re out and about with the kids.

So when apple pickin’ rolled around on a cool cloudy day this week you bet I was there, with rubber boots on my feet and a smile on my face. My little man was seriously not happy when he found out where I was headed, but one of my freshly picked apples did make a delicious after-school snack. He also loves my Apple Crisp, so I’ve promised to make one sometime soon. I think he has forgiven me, but maybe we will find time for a family outing to the orchard another day this season.

apple pickin'

For those of you who live close to St. Joe (and if not, it’s probably worth the drive), you might want to visit Schweizer someday soon. They still have several varieties of apples ready to pick and the pumpkin patch will open in October. They host several types of group tours, including our basic tour that costs $1.50 per child for story time, an orchard tour, and one apple chosen right off the tree. Moms can also pick apples and pay per the pound (I paid 99 cents a pound for my juicy hand-picked apples). In addition to the orchard, they have a great playground and picnic area, so it is really easy to enjoy most of a morning outside with the kids. They also have open hours for picking, so you don’t have to be part of a tour to enjoy the orchard. If you want to know more about Schweizer Orchards, you should visit their website or give them a call. . . before the trees are bare.

Happy Fall, Y’all

Happy Fall, Y’all

Happy fall, y'all

Okay, so it’s not quite officially fall, but I’m so ready to bust open my autumn and Halloween projects that I decided to get going here at Small Talk Mama. And what’s fall without a few mums around the house (honestly, I can’t seem to go to the store without coming home with a new fun color)?

Last week I purchased a small trio of pink mums for my back porch ($1 each) just to show off my latest repurposed project made from two sticks of old picket fencing leaning against a backyard tree. It was the last of some salvaged fence parts and was just enough to create this adorable little rustic wood tray. Considering I had some old drawer pulls that needed a home and nails enough to go around the world twice, this project barely cost a thing, except for the little feet underneath to give the tray some breathing room. I picked up those for a couple of bucks at the hardware store.

happy fall, y'all

Since I only had two four-foot-sticks of fence, I had to make every inch count. I cut both pickets in half and used three lengths to form the base of my tray. Since one of the lengths still had the dog-eared top on it, I placed it in the middle of the other two. You can see the dog ears from one end, but not from either side. I also think it lends a bit of personality to the finished project.

I then measured the width of all three bottom pieces lying next to one another, and cut two pieces that width out of the remaining wood. I had just enough left to go the distance. Whew! I lined up everything and screwed it all together from the backside of the tray, and then added the pulls on the top of the tray at each end.

happy fall, y'all

happy fall, y'all

I planned to use the finished tray on the wooden box/table on my back deck, but I didn’t want the tray to trap moisture under it and rot both it and the box. So I purchase some super cheap feet that I simply hammered in from the backside and this gave everything some breathing room. I can’t wait to change out the flowers for the seasons and make good use of my decorative DIY tray!

Okay, folks. I’ve shown you my mums, now I want to see yours. Happy Fall, y’all!