Tag: kids crafts

Kid-Friendly Canvas Valentine Craft

Kid-Friendly Canvas Valentine Craft

canvas Valentine craft
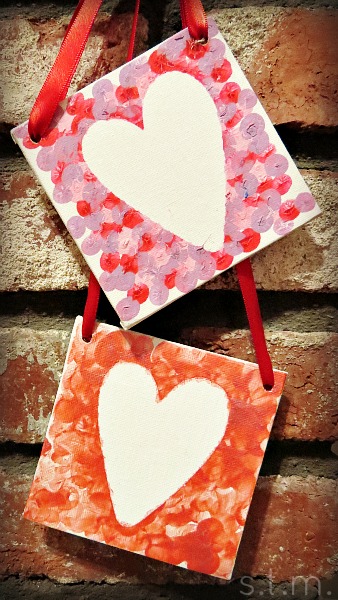
There’s still time to make a little Valentine craft with your kids this year, and this easy child-friendly canvas and paint project may just be the ticket. With the aid of a few other moms and teachers, I helped sixteen preschoolers create their own fingertip heart prints yesterday at my son’s school party, and each child’s unique take on the project was a success. Some went with the dotting method, some picked the smearing approach, and then some just went all out freestyle; but they all used their fingertips to paint, and on the back of every canvas was this sweet saying I penned ahead of time:

I made this little heart with fingertips of mine,
just to say I Love You and Happy Valentine.

So here’s how we put this Valentine craft together.

Materials:

  • 4×4 cardboard mounted canvas (I purchased mine at Michael’s, $4.99 for 4 plus a coupon discount)
  • vinyl paper (or other material that will stick to the canvas. Note: contact paper did not work.)
  • scissors or die-cutting machine
  • hole-punching device (I used my Crop-a-dile)
  • washable paint
  • ribbon
  • blow dryer (optional)

Instructions:

  1. Punch two holes at the top of your canvas board, one at each corner.
  2. Cut a heart out of the sticky paper using your scissors or die-cutting machine. I used my Cricut since I had to make so many.
  3. Peel the backing off the heart and stick it to the front of the canvas. Make sure you press down the edges well so that paint doesn’t seep under it.
  4. Using just a pointer finger, have your child paint the canvas. The idea is to make dots, but some children may not find this fulfilling, so freestyling may ensue. Whichever method makes your child happy, encourage him/her to paint completely around the heart, overlapping the sticker edges.
  5. Let the canvas dry. You can use a blow dryer to speed up the process.
  6. Pull off the sticky heart to reveal the white canvas under it.
  7. Write or print out and place the little fingertip rhyme above on the back of the canvas.
  8. Thread ribbon through the holes in the top of the canvas, tie knots and hang.

My son had such a good time making this Valentine craft that we just might make some more.  After all, I do know a couple of grandparents who might like to have their own.


From T-Shirt to Self-Tying Paint Smock 2.0

From T-Shirt to Self-Tying Paint Smock 2.0

paintsmockSince we are in the throes of Vacation Bible School prep, I decided to pull out one of my favorite VBS posts from my first days of blogging and repost it here today. I think it’s just awfully clever (yes, I say so myself) and has proven very useful. This  post was first published on August 6, 2013.

Okay, so it’s not often that I have a completely original idea, so here’s one for the books. . . or the blog, or however the saying must go in today’s electronic age. It’s not like it’s an earth shattering discovery or anything, but it sure did make last week’s VBS painting projects much less messy.

I picked up several extra large t-shirts from my Mom’s church for a buck each and planned to use them as paint smocks, but I didn’t think the children would appreciate us pulling them on and off their heads each day so I started thinking about an easy way to make them into backwards vests that somehow stayed on their little bodies. I wanted them to have ties in the back, but I just didn’t have the time or gumption to do a sewing project involving that many shirts.

Suddenly the thought occurred to me that perhaps there was a way to cut the shirts themselves so that they would be equipped with built-in ties, and that’s when this idea was born (now if I’m the last VBS craft girl on the planet to ever think of this, please tell me now so that I’ll stop being so darn pleased with myself).

Materials:

  • good pair of scissors (I keep a couple of pair just for material)
  • t-shirt

cuthereDirections:

  1. Lay the t-shit flat on a hard surface with the back facing up.
  2. Cut straight up the entire back of the shirt from hem to neckband.
  3. Flop the shirt over to the front and cut a slit just through the center of the neckband.
  4. Then cut around the neck band toward the back of the shirt on both sides, stopping about an inch and a half from cutting off the entire neck band on each side.
  5. These little flapping pieces of neckband will now be your ties.

Just have your child(ren) put on the shirt with the open slit at the back and use your two pieces of neckband to tie a loose knot at the top. That’s just how easy it is to make a mess-saving painting smock.


Shared at:
 Home Matters Linky Party


Rainy Day Caterpillar Craft

Rainy Day Caterpillar Craft

caterpillar1

It rained here today. . . for the umpteenth day straight. But thankfully it was also MOMS Club® craft day at my house, which is always a good way to spend a few hours of the day (especially when I don’t have to leave home). Today’s project was this cute little pompon caterpillar that was also a former VBS project, so rounding up the supplies was a breeze.

Here’s what you need:

  • 5 medium pompons
  • green craft foam sheet
  • printable leaf pattern
  • glue
  • small google eyes
  • flower stamen or light-gauge wire
  • clothes pin
  • hole punch
  • scissors

caterpillar2

How to make your cute caterpillar:

  1. Cut out a leaf from the green craft foam using the printable leaf pattern. If you want to add bite marks, use the hole punch to punch three holes in the side of the leaf.
  2. Adhere all five of the pompons onto your leaf using glue.
  3. Fold a flower stamen, or a short piece of wire, in half and glue it on top of the first pompon, and glue on two google eyes for the face.
  4. After all the pieces are dry, glue a clothes pin on the underside of the leaf so that you can clip this cute little caterpillar on any number of places.