Tag: home decor

Saturday Sparks — Advent Calendars

Saturday Sparks — Advent Calendars

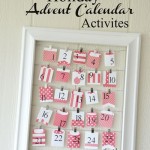
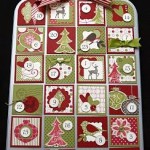
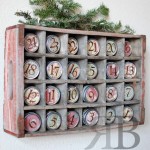
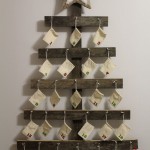
Okay, so I know I gave you a glimpse into my fall home décor just yesterday and although I’m not advocating the legitimate switch to Christmas I do know that if you (or I) have any hope of getting crafty for the coming season without the procrastination and stress, we probably should have started last year.  . . but where’s the fun in that? Okay no, not all homemade crafty hope is lost, so let’s talk Advent calendar ideas. I’m making this my top priority, because it’s an item that needs to be ready to roll on December 1 so my son can start counting down the days to Santa’s arrival.  You can see that I have compiled a great group of advent ideas, some super simple and some that require a little more time (did I mention time is probably not a luxury right now). Any who, I hope this compilation of calendars sparks a bit of Christmas creativity in each of you.

fa46c5053d6a7ca0020174e104a74846d1ea7a9e62d6ce818d0e4e27200ba3ffbad5bcc44780b87653f0c4711742b0b173599a80716053619f2772e9b656d0e47faa0290eea0d91b8bbf751f7f27d33b1ff8528d9e9b65af3a27f7191e6e9cfde6b9f609ba025f421906b38b2c0a7b39795578331ed3f3bf9ead69c9c3f79faf3c9669d12ea856f2cacee99e93b3ebd0faf5cf08c9725c477a7f8e136df90f9793d67bb3edfb123ee6a571f3452034123729c9f576755d2055029fa524d467eded13ffa0a5e66ead558629dbc58678cbc41c8104d1d6df95856349d58de638ee3d957564d1a6dfcfc05b2e3faea17eb2bf41011465b9e1aac1a7f18e20507b83e94901fb06f929867dd99ad485827cde1e0166be962cb253cb12e1fb93dad06a

My “Hello Spring” Mantel

My “Hello Spring” Mantel

mantel1

So here’s my latest mantel configuration, just in time for Spring. Of course there are a few touches of Easter like the bunny banner hanging in front and the chick picture on the right that lend a super springy feel to the whole thing. My husband isn’t crazy about the bluish-gray frame without a picture and said it looks like we’re having a garage sale; but I just ignored his comments, because it pulls in some accent color. . . and well, I just kind of like it.

mantle2
I picked up that metal bucket for cheap at Hobby Lobby the other day and found a beautiful bluish-green type of fern that fits perfectly. I love the color and shape of the leaves, but it’s so cool that it almost looks fake. In fact, the hubs was surprised to find me watering it yesterday.

mantle3
I love, love, love that metal cagey planter thing that I picked up for $10 at a local antique shop a few weeks ago. Paired with a candle, a couple of sets of books and a big metal “S” (for our last name or Small Talk Mama, if you will) and it makes for a nice, yet simple vignette.

Welcoming Rosette for Independence Day

Welcoming Rosette for Independence Day


Independence Day Rosette

Today I’m showing you the newest addition to my patriotic home decor, complete with easy instructions and printable.  This door-sized rosette was easy to make and you should be able to whip up your own in about half an hour or so — just in time for Independence Day.

Materials:

  • Three pieces of red cardstock – 8 1/2 x 11″
  • Two pieces of decorative blue paper – 12 x 12″
  • One piece of coordinating decorative paper – 12 x 12″
  • Paper adhesive
  • Small piece of twine (for hanging)
  • Craft Glue
  • July4Rosette printable (pdf)
  • Dark brown ink pad

july4rose2july4rose3

Instructions:

  1. First, let’s make the large blue rosette portion of the project by cutting the two pieces of blue paper in half so that we end up with four pieces of 12 x 6″ strips.
  2. Ink the outside edge of each piece with the dark brown ink pad. Score each of these pieces at every inch and according fold.
  3. Using adhesive, connect all these pieces together. Keeping the paper flat, fan out the pieces in a circle and adhere the two ends together to create the rosette. To keep this crazy thing flat while you work, you can place a light-weight book or magazine on top of the newly formed rosette.
  4. Next, we’ll make the center of the rosette by cutting one piece of red cardstock into a circle approximately 8″ in diameter. I used my Cricut to cut the scalloped edge, but you can use whatever you have — cutting machine,  decorative scissors or circle cutter.
  5. Ink the edges of the circle and glue to the center of the rosette using paper adhesive or glue.
  6. Print out the July4Rosette rosette center and cut into a circle, about an eight of an inch away from the outside words. Ink the edge all the way around and adhere to the red circle.
  7. To create the tails to the rosette, cut the two remaining sheets of read cardstock down to 6 x 11″ and then cut a triangle out of each piece to form the banner shape. Ink the edges.
  8. Cut the coordinating sheet of decorative paper to create two pieces that are a half inch smaller than the cardstock tails and cut a coordinating triangle in each piece. Ink all the edges and adhere to the cardstock tails.
  9. Adhere the completed tails to the back of the rosette at whatever angle you like.
  10. After everything is assembled, cut a short piece of twine and tie a loop for hanging. Flip over the rosette, add a dab of glue and adhere the twine loop.
  11. When the glue dries, hang your welcoming rosette for all your guests to see.


Page 3 of 4
1 2 3 4