Tag: fun

Strike Up Summer with Free Bowling for Kids

Strike Up Summer with Free Bowling for Kids

RettBowl2So you probably already know that last week was Spring Break here and we played host to my sister and two thirteen-year-old girls from Oklahoma. The trip was meant to be an inexpensive change-of-scenery trek, so we tried to keep ourselves busy doing fun little activities about town. One afternoon, we decided to hit the local bowling lanes for a few hours, which was my four-year-old son’s first foray into the sport. Of course foot stomping, tears and frustration followed, but when the bumpers finally went up he was a happy guy (thank you bowling alley guy who saw the tears, offered the lane next door and raised the bumpers to boot).

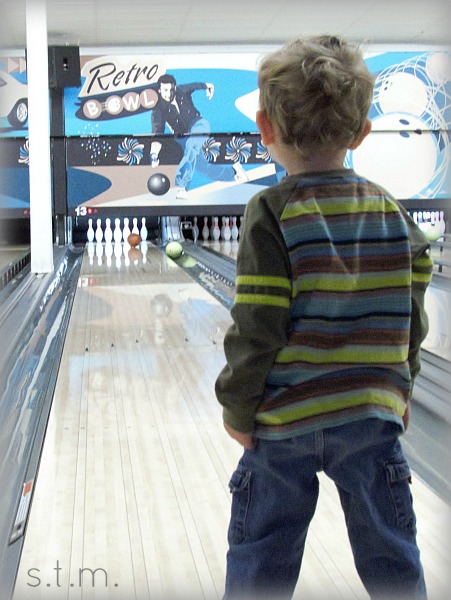
If you notice the presence of not one, but two bowling balls in the picture, you get the idea of why he was so upset. Yes, we finally got the green ball out of the gutter and moved on to happier times. Although it was a bit stressful at first, I would definitely do it again (and I think he would too), and thanks to the Kids Bowl Free program we can surely get our fill in the months to come, and maybe even then some.

Yes, I said FREE bowling! Simply visit the Kids Bowl Free site and locate a participating U.S. or Canadian bowling alley near you. This program is designed by bowling centers to give back to the community and provide a safe, secure, and fun way for kids to spend time during the summer. Children whose age does not exceed a limit by a participating bowling center are eligible to register for two free games a day (shoe rental required) all summer long, courtesy of the participating bowling centers along with certain schools and organizations. That’s an awesome deal, I’d say!

So if you’re looking for us in the heat of the coming summer, we’ll be enjoying the AC and knockin’ down some pins at the local lanes. I hope you’ll join us.

Just in Time for St. Patty’s Day Wreath

Just in Time for St. Patty’s Day Wreath

Spring Break is winding down here at the Quarter-Acre Wood and this week has been filled with lots of goings-on that I can’t wait to share with all of you. I’m way behind on my latest events and accomplishments, because my sister, great niece and one of my niece’s friends arrived Sunday to do Spring Break Kansas City style and we have been going ever since.

So first, let me back up to St. Patrick’s Day, yes I know it came and went. . . three days ago, but I so want to show you my new little craft project perfect for the greenest of days. Okay, so I bought the supplies a month ago but I only put it all together the morning of the seventeenth (I told you I was a procrastinator). I was completely determined to make that wreath by St. Patty’s Day, even if it took me until midnight. I’m happy to say it went together quite quickly and we got to enjoy it for several hours. Oh, who am I kidding, it’s still hanging on my door. . . but it’s just so cute. 

St. Patty's Day wreath

Here’s what you’ll need to make your own St. Patty’s Day wreath :

  • 1/4 yard of 5 different green fabrics
  • heavy-gauge wire or coat hanger
  • rotary cutter and cutting mat or scissors (a rotary cutter will make this project a snap)
  • ribbon

This is how you put it all together:

  1. To create the round shape, I used wire that was less stiff than a coat hanger, but still had enough strength to hold it’s shape. I would love to tell you what gauge it happened to be, but that label has long since gone away. Just shape the wire and bend the ends together or, if you’re using a coat hanger, snip off the hanger part and then shape into a circle. I ended up with a circle diameter of 15″, but you can make it a bit larger or smaller as needed.
  2. Using my rotary cutter, I cut 1″ x 6″ strips from each of the five fabrics. You can use scissors or the snip and rip method to cut your strips, but a rotary cutter makes this task so much faster, especially if you fold your fabric a couple of times.
  3. I cut 32 strips from each of the fabrics and used just about everyone one of them on my 15″ diameter wreath. So that was approximately 160 small little pieces of fabric.
  4. To adhere the fabric, simply tie them in a knot all the way around the wreath. I chose a pattern in which to tie them and stuck to it all the way around. Tie a few pieces and then push them together tightly around the wire, then repeat. By continually pushing the tied pieces together, you will get a fuller, fluffier finished product.
  5. After all the fabric strips are tied to your wreath. Cut and tie a long piece of ribbon for the bow.
  6. Lastly pull all the fabric strips ends toward the front of the wreath and fluff them for a finished look.

My sister, the one in town, thought this was a really cute project and made plans to create an Easter or Spring wreath of her own. You really could do one for any holiday just by changing the fabric you choose.

Kid-Friendly Valentine Banner

Kid-Friendly Valentine Banner

Last year my son (three years old at the time) and I spent part of a cold snow day creating a cute little Valentine project for aunts and grandmothers (of course I kept one for myself). Although they all might have been a bit biased, these cute little banners were a hit; so today I thought I would re-share our kid-friendly craft with all of you. I came up with this quick banner idea by combining a couple of Pinterest projects with some of my son’s favorite things — paint and glue.

 To create your own Valentine banner you will need:

  • brown paper lunch bags
  • empty toilet paper/paper towel roll
  • red washable paint
  • scissors
  • glue
  • string

To begin the project, cut a paper bag right above the bottom fold. Then cute along the two outside edges to give you two rectangular banner pieces. If you want, you can cut a triangle out of each of those pieces or just leave them square on the bottom. Cut as many bags as you desire for your project. If your child is old enough to handle the scissors, great but make sure an adult supervises this task (I let my three year old, cut on some scrap pieces, but he wasn’t up for the first part of this project).

TPheartstamp2Next, shape the empty toilet paper roll into a heart. I started by creasing the top inward, being carefully not to make creases in the rounded parts of the heart, and then I creased the bottom point of the heart. After you have the shape to your liking, pour some washable paint on a paper plate. Have your child grasp the TP heart roll around the middle to hold its shape, dip an end into the paint and stamp it onto each banner piece. Your child can redip as necessary.

After the paint dries, flip over each banner piece and run a bead of glue along the top of each one. My son loved doing this and it really didn’t matter that he got a little sloppy (you might want to cover your work space before this step). Meanwhile, I cut string long enough to span each banner with a small gap between and extra for tying off at the ends. After the glue was in place, I came along and pushed the string into each bead of glue. We let it dry over night and by the next day we had a truly heart-warming Valentine banner to hang about the house.

If watching your youngest glue paper bags to his fingers, the table and the cat is not your idea of a good time, you might try one of these alternative methods. 1) Punch a hole at the top of each side of your banner pieces and run the string through the holes to create your finished banner. 2) Fold the top of each banner piece over the piece of string and staple the flap in place to create your finished banner. Which ever finishing touch your choose, pick one that works best with your child’s taste and strengths (and your mama mess index).

Page 1 of 2
1 2