Tag: Easter

“A Real Cute Chick” Card

“A Real Cute Chick” Card

OWH248

OWH-Sketch-248
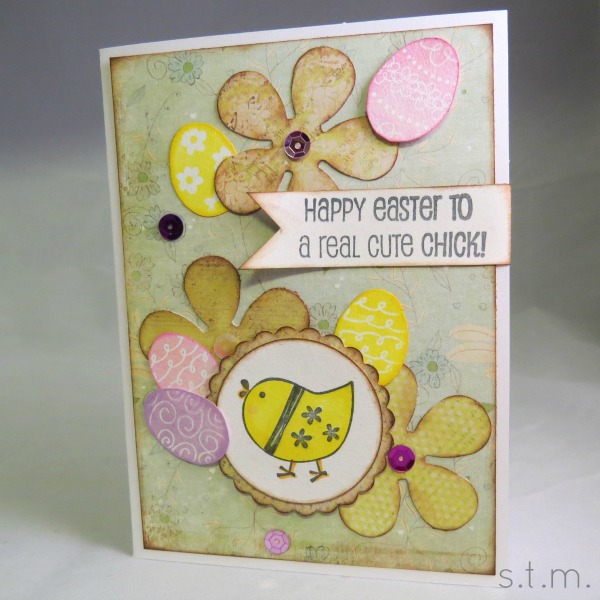
Whew, this latest Operation Write Home sketch challenge was a toughy. But after much thought and lots of digging through all sorts of stamps, stickers, papers and punches, I finally came up with a concept to follow the sketch. Since Easter is quickly closing in on us and the OWH deadline for these cards is at the end of the month, I decided to go with a card befitting this celebration (plus I had those really cute egg stamps that had never been used). While it’s not my most favorite card ever, I think it turned out kind of cute.
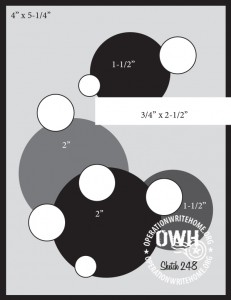
Cute Little Chick Pic

Cute Little Chick Pic

Since my husband won’t buy me an actual peeping chick for Easter (something about coyotes and bobcats eating them or something), I decided to make my very own. I needed to dust off my Cricut machine anyway and I am always looking for a reason to pull out my ever-growing collection of washi tape.

chickpic2

 This is a quick little project to create, and as long as you have the supplies on hand it can be really inexpensive to complete. Here’s what you’ll need to hatch your own little chick pic just in time for Easter day.

Materials:

  • Cricut machine
  • Celebrate With Flourish“ Cricut cartridge (or suitable substitute)
  • Yellow piece of card stock
  • White piece of card stock
  • Variety of coordinating washi tape
  • Coordinating ink pad
  • 8×10 photo frame
  • paper cutter

Directions:

    1. Using your Cricut cartridge and machine,  cut a six-inch chick out of the center of the yellow cardstock. You actually just want to use the paper with the shape cut out of the middle, so just set aside the chick shape and find some other use for it later.
    2. Cut down the yellow and the white sheets of cardstock to fit in the 8×10 frame, making sure to keep the chick centered on the yellow piece.
    3. Ink the edges of the chick shape on the yellow cardstock to help give it definition.
    4. Adhere several strips of washi tape straight to the white cardstock in an area larger than the centered chick shape. I placed mine at an angle for added interest, but you can do it however you like.
    5. Place the yellow cardstock on top of the white cardstock and stack them in the picture frame so that you have a colorful little chick pic all your own. Note:  If you have any pieces that are not connected to your main image, like the little gap between the chicken legs, you can adhere those straight to your page before you place your artwork in the frame.

Yup, it doesn’t get much easier than that to create an adorable Easter work of art. You can also use other silhouetted images like bunnies, baskets and eggs if you want to experiment with different looks. Happy Easter!

Shared at:
That DIY Party @ DIY Showoff


A Bunny Banner All Your Own

A Bunny Banner All Your Own

banner2B

Yes, Easter is just a few days away, but you still have plenty of time to whip up this cute little bunny banner just in time for the holiday. . . especially if you use an inexpensive roll of burlap as your base. Below you can see the basic supplies I used and some are optional, but the best way I’ve found to create a quick banner is to stay clear of large expanses of material and focus on burlap that is more user friendly.

bunnybannersuppliesMaterials:

  •  Roll of unwired, unfinished burlap
  •  Liquid Fray Stop
  •  Off-white/white acrylic paint
  •  Pink acrylic paint
  •  Bunny template (pdf file)
  •  Pink Stickles (optional)
  •  Medium white pompons
  •  Twine or jute
  •  Fast drying craft glue
  •  Scissors
  •  Foam brush
  •  Small bristle paint brush


Directions:

  1.  Cut five strips of burlap from your roll. My roll was four inches wide, so I made each strip eight inches long (Making your length twice as wide as the width is a good rule of thumb).
  2.  Cut a triangle out of the bottom of each of the strips to form the banner shape.
  3.  On the back of each burlap strip, run a bead of Fray Stop around all the edges. Don’ put it right at the edge, because you want just a wee bit of fraying to occur.
  4.  After the Fray Stop has dried, turn your burlap pieces back over and use your foam brush to apply a light coat of white paint to the front of each piece — do not go all the way to the edges.
  5.  Print off a copy of the bunny template (pdf file) on a piece of card stock paper, if you have it. Cut out the template to create a bunny shape in the middle of your sheet of paper.
  6.  After your white paint has dried, center your template on a burlap piece and using your foam brush dab the pink paint on to create the bunny shape. (Use light coats of paint and add as necessary, but make sure to use a pouncing motion instead of a brushing motion.) Repeat this step for each of the banner pieces.
  7.  After the pink paint dries, this next step is optional but I found that it really helped draw attention to the little rabbits. I used pink Stickles and a small bristle brush to cover the pink area with a bit of sparkle. I chose Stickles instead of glitter just for the ease of use. Glitter tends to stick to burlap in all the wrong places.
  8.  After everything is dry, use the quick-drying craft glue to adhere your white pompon bunny tails.
  9.  When the tails are dry (yes, there are a lot of “watch it dry” moments in this project), slightly fray the edges of each of your banners.
  10.  Lay out your banner pieces with desired spacing and cut a length of twine/jute to span the distance, adding a foot or so at each end for hanging.
  11.  Flip over each banner, run a bead of quick-drying craft glue along the top back edge of each banner and lay your twine or jute in the glue to dry. And yes, that’s the last time you have to watch it dry, because you’re officially finished. Just hang and enjoy!


banner1banner3


Shared at:
What’s It Wednesday @ Ivy and Elephants
WWAW @ Green Willow Pond
Pin It Monday @ Pursuit of Functional Home
Wow Us Wednesday @ Savvy Southern Style
That DIY Party @ DIY Showoff

Page 4 of 5
1 2 3 4 5