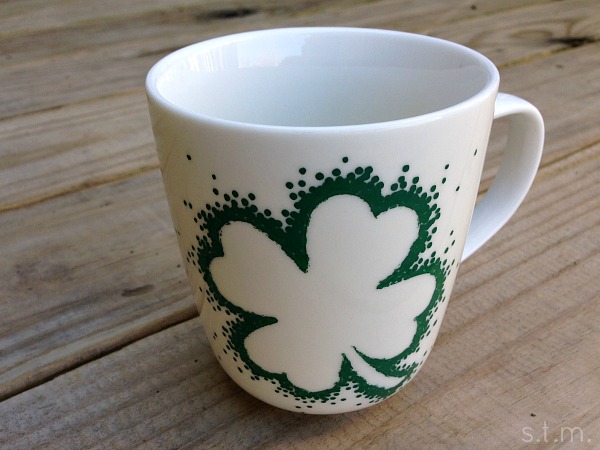
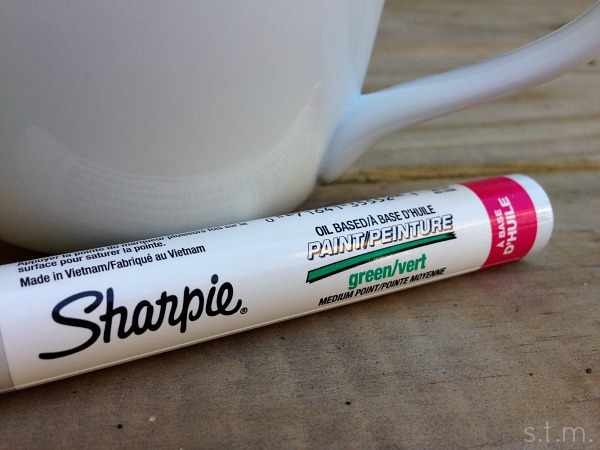
Okay, I’ve wanted to try this Sharpie technique for quite some time now, so with a Michael’s coupon burning a hole in my pocket I picked up a Sharpie oil paint marker in the perfect St. Patrick’s Day shade of green and went to work on one of our white coffee mugs (we have an ample supply, which drives my husband crazy. . . but that’s another story).
I was so excited that this Sharpie shamrock mug project turned out like the picture in my head, and it even made it through the dishwasher cycle as I held my proverbial breath. When my husband walked in and called it “cool;” well that just settled it, I had to share. So here’s how this cute little project goes..
Materials:
- Coffee Mug
- Sharpie Oil Paint pen
- Contact paper
- Rubbing alcohol
- Scissors or Die-Cutting Machine with shamrock cartridge
- Pen and shamrock shape, if you don’t have a machine that will do this for you.
- cookie sheet
- aluminum foil
Instructions:
- Wipe down a clean coffee mug with rubbing alcohol to take off any soap residue or finger oils. Let dry.
- Trace and cut out your shamrock shape on the contact paper, or if you happen to own a die-cutting machine and appropriate cartridge you should definitely go with that. I used my Cricut machine and Small Talk Frames & Tags cartridge (ha, just like it was made for me) set at 3 inches to cut out a contact paper shamrock.
- Stick the shamrock shape on the mug in your desired location, burnish the edges with your finger to make sure all the edges adhere to the mug.
- Prime your paint pen per manufacturer’s directions and practice making dots before you start on your mug. The pressure you use will determine the size of your dots.
- When you’re ready to start painting your mug, start making dots with the paint pen all the way around the edge of the contact paper first. You will want a solid line of dots around the entire edge so that when you remove the sticker you will see a perfect outline.
- Continue making dots to fill in gaps and work your way outward. This is where you get to use your creative license, because you can make your dots as far apart and away as you want. Just keep going with the dotting until it looks right to you.
- When you are finished painting, remove the contact paper and allow your mug to dry for 24 hours.
- Line a cookie sheet with aluminum foil and place your mug upside down on the foil.
- Place the cookie sheet and mug in the oven, set it to 425 degrees and start baking. It’s important to put your mug in the over before it starts heating; otherwise, your project might crack.
- After the temperature reaches 425 degrees, bake for 30 minutes. Remove the VERY HOT mug using a pot holder and set it on the stove top to cool or just let it cool in the oven if you’re not making dinner anytime soon. Let it cure for 24 hours, and it should be ready to go.
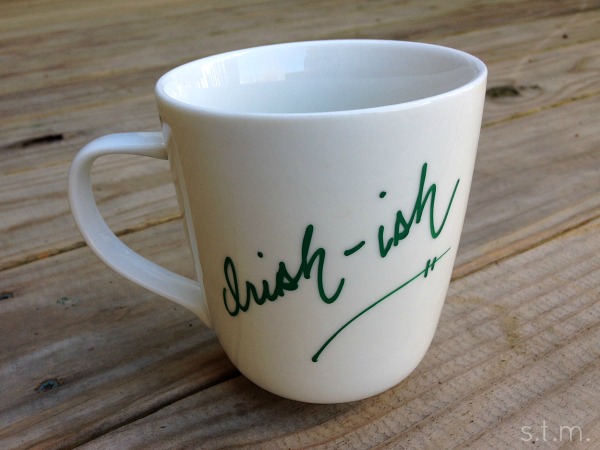
I decided to test the durability of my shamrock mug by washing it in the dishwasher after a couple of days, and it actually held up pretty well. I think a few dots washed off (probably because there were so many layers), but it held up pretty well. I since have hand washed it in warm soapy water and it seems to be holding up well. The back of the mug just has a hand-written saying that held up really well in the dishwasher, but I’m just saying automatic wash at your own risk. Overall, I’m pretty pleased with the outcome and durability of this fun little project. This is one you might want to give a try.
Can anyone advise on how to remove my lovely wife from the Michaels and JoAnns mailing list and these pesky coupons that “save” us so many $$$??
Thanks
Well aren’t we the funny one this morning, husband of mine?? It beats paying full price! 🙂